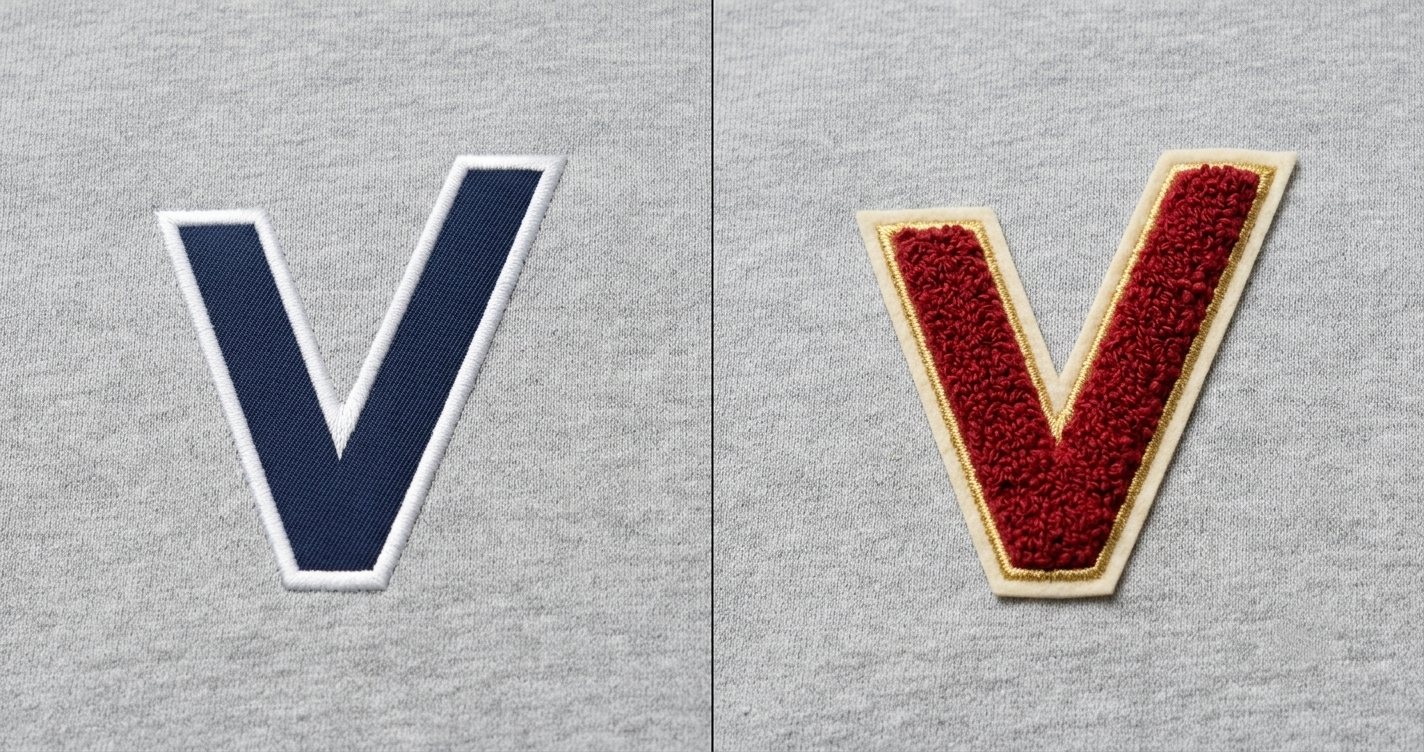
Short answer: Applique sews cut pieces of fabric onto the garment and seals the edges with a satin stitch, so it covers large shapes and big lettering with a low stitch count on a standard embroidery machine. Chenille builds a raised, looped yarn texture using moss and chain stitch, and it needs a chenille capable machine. Choose applique when you want bold coverage, crisp edges, and a lighter, more economical run. Choose chenille when the plush, raised texture is the whole point, as it is on varsity letters and patches.
Ask a customer for something that stands out on a jacket or hoodie and the request usually lands on one of two techniques: applique or chenille. Both are used for big, bold designs, but they look different, run on different machines, and need completely different files. Pick the wrong one and you end up with a design your equipment can't run, or one that doesn't look anything like what the customer pictured.
This guide covers how each technique works, how applique digitizing and chenille digitizing differ, and how to decide between them. It's written for decorators, promo companies, and print shops that either run these jobs or send them out.
What Is Applique Embroidery?
Applique swaps thread for fabric. Instead of stitching a big solid shape with thousands of stitches, the machine sews down a piece of twill, felt, or similar material and seals the edge with a satin border. The fabric supplies the color and the coverage. The thread just holds it down and finishes it.
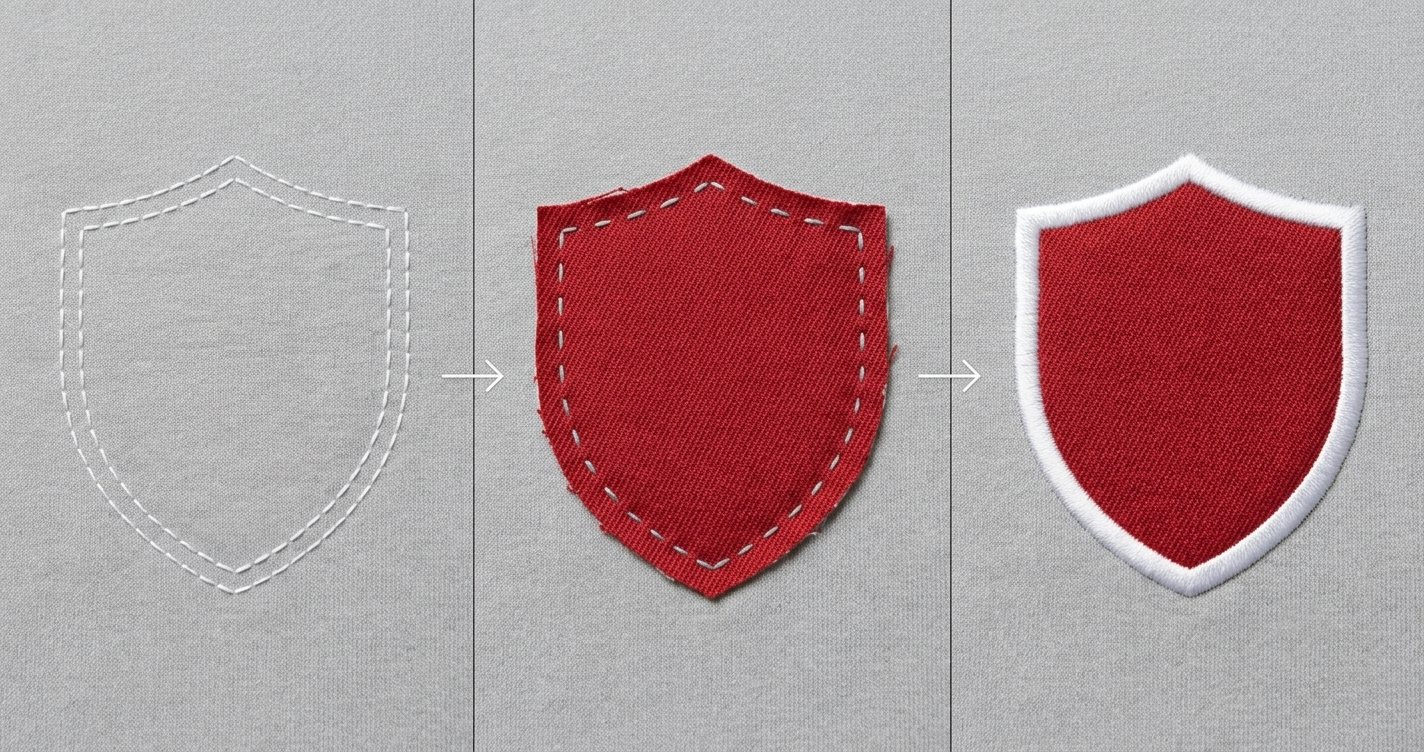
A properly digitized applique file runs in three steps:
- Placement line. A single running stitch outlines exactly where the fabric goes, then the machine stops.
- Tack down. The fabric is laid over the outline and a tack down stitch secures it. If the fabric was cut by hand, the excess is trimmed close to this line. Shops that pre-cut their pieces with a laser or cutter skip the trimming.
- Cover stitch. A satin border, usually around 3.5 to 4 mm wide, covers the raw edge and gives the shape its finished outline.
Where applique works well:
- Large block letters and numbers, such as team names and Greek letters
- Big logos and shapes with solid areas of color
- Lighter or stretchy garments where a dense thread fill would pucker the fabric
- Jobs where a lower stitch count keeps run time and thread use down
Where it struggles:
- Small text and fine detail. A common rule of thumb is to skip applique for lettering under about 1 inch tall
- Shapes narrower than the satin border, since there's no room to cover the fabric edge
- Loose weave fabrics that fray badly at the edge
What Is Chenille Embroidery?
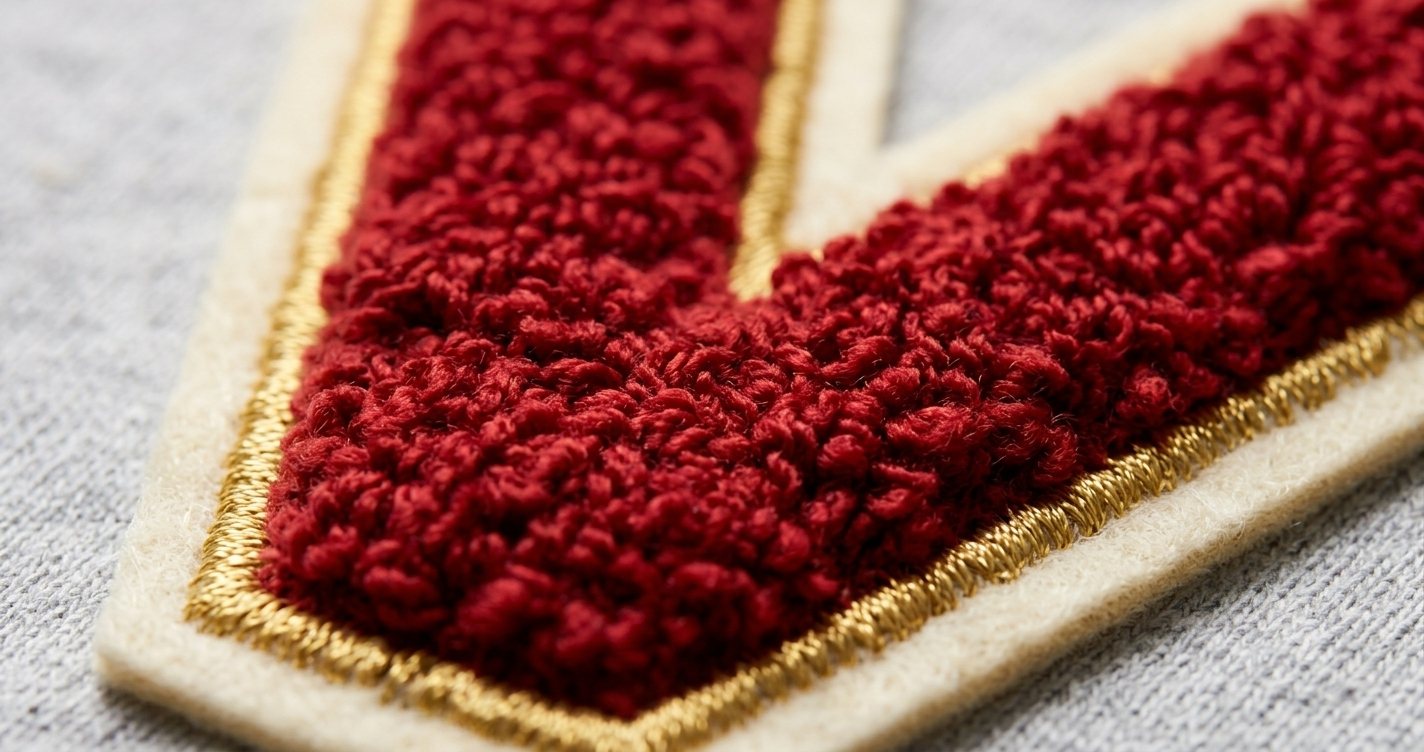
Chenille is the raised, fuzzy texture you see on letterman jackets and varsity patches. It's made with a single yarn worked into the fabric in loops, not the top thread and bobbin thread pair used in regular embroidery. A hooked needle and a looper under the needle plate pull the yarn up one loop at a time.
Every chenille design is built from two stitches:
- Moss stitch makes upright loops. It's used for fills, and it's what gives chenille its plush, dimensional look.
- Chain stitch makes flat, linked loops. It's used for outlines, borders, and finer detail, and sometimes for flatter fills.
True chenille needs a chenille capable machine, either a dedicated one or a combination machine that also sews standard embroidery. A regular lockstitch machine can't produce it, which is why plenty of decorators send chenille out instead of investing in the equipment. It's commonly stitched onto felt, and it's a staple on sportswear, letterman jackets, and varsity patches.
Where chenille works well:
- Bold letters, numbers, and mascots on varsity style apparel
- Letterman jackets, sweatshirts, and patches
- Premium looking pieces where texture is the selling point
Where it struggles:
- Small text and thin lines. The yarn is thick and detail fills in, so a common rule of thumb is to keep lettering around 2 inches tall or larger
- Anything that needs sharp, precise edges
- Jobs where you don't have a chenille machine or a partner who runs one
How Applique and Chenille Digitizing Differ
The two techniques share almost nothing at the file level. A file built for one can't be converted into the other by changing a setting. Each has to be digitized for the way the machine actually sews it.
Applique digitizing
Applique digitizing is mostly about sequence and geometry. The file has to hold the placement line, tack down, and cover stitch as separate steps, with machine stops where the operator needs to place or trim fabric. The digitizer also has to size the shapes so the satin border fully covers the cut fabric edge. The fabric itself should be cut slightly larger than the placement line, so the tack down catches it and the cover stitch can seal it.
Tight curves and sharp inside corners need extra care, since fabric doesn't turn a corner as neatly as thread does. If you pre-cut your fabric, tell your digitizer so the placement line and the cut pieces line up.
Chenille digitizing
Chenille digitizing replaces satin and fill stitches with moss and chain objects. Moss is generally used for fills and chain for borders, and the digitizer sets things like needle height, which controls how tall the loops sit. Because chenille yarn is much thicker than embroidery thread, overlapping stitches pile up fast. Digitizers keep shapes simple and use open fill patterns to avoid a lumpy result.
Chenille files also have to match the machine that will run them, so confirm the machine and the file format before you order.
Applique vs. Chenille at a Glance
| Applique | Chenille | |
|---|---|---|
| Look and feel | Flat fabric surface with a satin border | Raised, plush, looped texture |
| Made with | Cut fabric (twill, felt) plus thread | A single looped yarn |
| Stitch types | Placement, tack down, satin cover | Moss for fills, chain for borders |
| Machine needed | Standard embroidery machine | Chenille or combination machine |
| Best for | Large shapes, block letters, solid color areas | Bold letters, numbers, mascots |
| Fine detail | Limited, needs shapes wider than the border | Very limited, needs large scale |
| Typical products | Team wear, uniforms, kids apparel, hoodies | Letterman jackets, sweatshirts, varsity patches |
| Extra labor | Cutting, placing, and trimming fabric | Specialty setup, often outsourced |
How to Choose Between Applique and Chenille
Start with what the customer actually wants, then work back to your equipment and the artwork.
- Texture or coverage? If the customer wants a raised, plush look, that's chenille. If they want a big, bold, flat shape, applique gets there with less thread.
- What machines do you have? Applique runs on a standard embroidery machine. Chenille needs a chenille capable machine or an outside partner.
- How big is the design? Both techniques suit large artwork. If the design is small or full of detail, standard embroidery is the better call for either one.
- What is the garment? Heavy jackets and sweatshirts carry chenille well. Lighter or stretchy garments usually do better with applique, where fabric replaces the dense thread fill.
- What is the budget? Applique typically costs less to run. Chenille is a premium technique and is priced that way.
You also don't always have to choose. Both techniques pair well with standard embroidery, so a design can use applique or chenille for the big shapes and regular stitching for outlines and small text. Varsity patches often mix chenille with lockstitch embroidery for exactly that reason.
What to Send Your Digitizer
For the fastest, most accurate turnaround, provide:
- Vector or high-res artwork (see our guide to vector conversion)
- The technique you want, or a note that you'd like a recommendation
- Final size in inches and the placement on the garment (placement changes the file, as we cover in our left chest vs. full back digitizing guide)
- Garment type and color
- For applique: the fabric type and colors, and whether the pieces are hand cut or pre-cut
- For chenille: the machine you run and the file format it needs, plus yarn colors
- Thread or Pantone references if colors need to match
If you aren't sure which technique fits, send the artwork and the placement and ask for a recommendation before digitizing starts. It's a lot cheaper to change the plan on paper than after a test sew.
FAQ: Applique vs. Chenille
What is the difference between applique and chenille embroidery?
Applique sews cut fabric onto the garment and finishes the edge with a satin stitch, which gives a flat, bold shape with a low stitch count. Chenille uses a single looped yarn, worked in moss and chain stitch, to create a raised, plush texture. Applique runs on a standard embroidery machine, while chenille needs a chenille capable machine.
Is applique or chenille cheaper to produce?
Applique is usually cheaper on large designs because fabric replaces thousands of fill stitches, although cutting and placing the fabric adds labor. Chenille usually costs more per piece because it needs specialized machines and yarn, and many shops outsource it.
Can applique or chenille be combined with standard embroidery?
Yes. Both techniques pair well with standard embroidery for outlines, small text, and fine detail, and varsity style pieces often mix chenille with regular lockstitch embroidery. Each part is digitized as its own layer, so tell your digitizer up front that the design is a combination.
How big does lettering need to be for applique or chenille?
As a rule of thumb, applique lettering works best at about 1 inch tall or larger, because the satin border needs room to cover the fabric edge. Chenille lettering usually needs to be bigger, around 2 inches tall or more, because the yarn is thick and fine detail fills in. Smaller text is better done with standard embroidery.
How long does applique or chenille digitizing take?
Standard turnaround is 12 to 24 hours when outsourced to a dedicated production art team, with rush service available in as little as 4 hours.
Vertex Creative Solutions digitizes applique and chenille designs for apparel decorators, promotional product companies, and print shops across the USA, UK, Canada, and Australia. Typical turnaround is 12 to 24 hours, with rush options in as little as 4.
Explore Embroidery Digitizing arrow_forward